4.0 - System Hardening
4.1 - The Principle of Least Privilege
- Airport Analogy
- Consider an airport passenger, what procedure must they go through?
- Baggage drop-off and ticket validation
- Travel document verification
- Security / Carry on check
- Move to a specific departure gate; users can access other areas during this time, but some restrictions still apply.
- This suggests that in security management for a system, there are multiple entities involved; each with their own permissions and privileges
- Considering the privileges of each of the entities:
- Traveller - Unrestricted access to public spaces in the airport after check-in and the designated gate
- Baggage - Has access to the travellers documents and the airlines information
- Security officers - can inspect the belongings of travellers in the area
- Store employees - public and restricted areas
- Boarding gate - access to the documents
- Cleaners and cargo workers - access to public and certain restricted areas
- Pilots / Flight crew - complete aircraft access and certain areas of the airport
- They have access only to the plane(s) of their airlines
- In this case, each entity has the least / minimum amount of privileges required to perform their role.
- This principle is applicable to computer systems and K8s clusters.
- Kubernetes cluster security, via the least privilege principle, can be enforced via multiple options including:
4.2 - Minimize Host OS Footprint Intro
- Reducing the attack service
- Achievable by keeping all systems in the cluster in a simple and consistent state
- Any inconsistent or weak nodes could be attacked
- Consistency can be enforced by Least Privilege Principle
4.3 - Limit Node Access
- As standard practice, exposure to the internet of the control plane and nodes should be limited.
- For self-hosted clusters or managed K8s clusters, this can be achieved via a private network; access can then be achieved by a VPN
- If running in the cloud, control plane access may be unlikely
- If implementing a VPN solution is impossible, one can enable authorized networks via the infrastructure firewall
- Allows/denies access from particular IP addresses
- Note: Attacks may not come from external sources, entities with network access within the cluster may allow internal attacks.
- One must therefore consider restricting access within the cluster.
- Example - SSH Access:
- Administrators require it
- Developers do not require it usually and therefore they should be restricted.
- End users shouldn't have access too.
- Account Management - There are 4 types of accounts:
- User accounts - Any individuals needing access to the system e.g. developers system administrators
- Superuser account - Root Account, has complete access and control over the system
- System Accounts - Created during the system development, used by software such as SSH and Mail
- Service Accounts - Similar to system accounts, created when services are installed on Linux e.g. Nginx
- Viewing user details - Commands:
- Id - provides details regarding user and group id
- Who - lists who is currently logged in
- Last - last time users logged into the system
- Access control files:
- All stored under
/etc/folder/passwd- contains basic information about system users, including user id and default directory/shadow- contains the passwords for users, stored in hash format/group- stores information about all user groups in the system
- The above commands and configuration files should be used to investigate user permissions and access; limiting as appropriate based on least privilege principle.
- Disable user account by setting default shell to a nologin shell:
usermod -s /bin/nologin <username> - Delete user -
userdel <username> - Delete user and remove from group -
userdel <username> <groupname>
4.4 - SSH Hardening
- SSH used for logging into and executing commands for remote servers
- General access via any of the following commands:
ssh <hostname or IP address>ssh <user>@<hostname or IP address>ssh -l <user> <hostname or IP address>- Remote server must have an SSH service running and port 22 opened for communication
- Additionally, a valid username and password for the user should be created on the remote server; or an SSH key.
- To maximise security for access:
- Generate key pair (public and private key) on the client system
- Public key shared with remote server
- Creation:
ssh-keygen -t rsa- Enter passphrase = optional, but enhances security
- Public key and private key stored at
/home/user/.ssh/id_rsa.puband/home/user/.ssh/id_rsa respectively
- Copy public key to remote server:
ssh-copy-id <username>@<hostname>- Password required for authentication on the server; shouldn't be required after key copying
- On the remote server, the keys should be stored at
/home/user/.ssh/authorized_keys - Hardening the SSH service:
- On the remote server; can configure the SSH service to enhance security.
- Possible actions:
- Disable SSH for root account - no one can log into the system via the root account, only their personal user or system accounts
- In line with the principle of least privilege
- Requires updating of the ssh config file, located at
/etc/ssh/sshd_config-> set PermitRootLogin to no - Could also disable password-based services if using SSH key based authentication -> set
PasswordAuthenticationto no - Once changes are applied, restart the service: systemctl restart sshd
- Additional information available via section 5.2 of the CIS Benchmarks https://www.cisecurity.org/cis-benchmarks/
4.5 - Privilege Escalation in Linux
- Following disabling of root user access via ssh, need to consider when users may need root / administrative access credentials; this is provided by the
sudofunctionality (prefixed before any command) - Default configuration for sudo is under
/etc/sudoers; it can only be edited viavisudo - The sudoers file defines user privileges for
sudo

- Administrators can give granular permissions
- User mark has all permissions
- User sarah has sudo permissions only for restarting the system
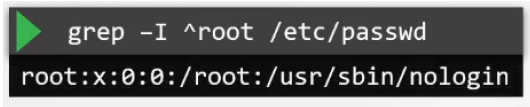
- Any sudo commands ran are executed in the users local shell rather than root shell -> can eliminate the need for ever logging in as a root user directly
- This can be done by editing the
/etc/passwdfor root user like below
- Sudoers syntax
- Anything beginning with
# or $is a comment - Content split into fields:
- User or group the privilege(s) are to be granted to,
- Groups are prefixed with
% - Host the user can make use of the privileges on
- By default, set to all, applies to localhost in most cases
- Users and Groups the user in field 1 can run the command as
- Command(s) runnable by the user(s) via
sudo
4.6 - Remove Obsolete Packages and Services
- In general, systems should be kept as lean as possible, making sure that only the necessary software is installed and they are kept updated to address security fixes
- This can be applied for standalone systems, Kubernetes systems, etc.
- Any software that isn't used should be uninstalled for general reasons including:
- Increased complexity of the system - one more package to maintain
- It may remain unused and take up unwanted space
- If not maintained, additional security vulnerabilities may arise that could be taken advantage of
- Removing services:
- Services start applications upon Linux system booting
- Managed by the Systemd tool and the systemctl utility
- E.g.
systemctl status <service>- Provides details regarding the service, including where its configuration file(s) are located
- As with packages, only necessary services should be kept running or available on the system
- To view the system services: systemctl list-units --type service
- To remove a service:
systemctl stop <service>
- Once services for unwanted packages are stopped, one can remove the associated package(s) via
apt remove <package name> - Additional information available in section 2 of the CIS Benchmarks.
4.7 - Restrict Kernel Modules
- Linux kernel modules has a modular design - its functionality can be extended via the addition of extra modules
- Example - Hardware support for video drivers via graphics cards
- Modules can be added manually -
modprobe <module name> - List modules in the Kernel - lsmod
- Note: When kubernetes workloads are running, non-root processes on pods may cause network-related modules to be installed on the Kernel - This can lead to vulnerabilities exploited by attackers.
- To mitigate, modules on cluster nodes can be blacklisted - achievable by creating a
.conffile under/etc/modprobe.d - Any modules to be blacklisted should be included as an entry via:
blacklist <modulename> - Upon entry addition, the system should be restarted and tests should be ran to see if the module is still running:
shutdown -r now
lsmod | grep <modulename> - Example modules that should be blacklisted -
sctpanddccp - Additional information available in section 3.4 of the CIS Benchmarks
4.8 - Identify and Disable Open Ports
- Several processes and services bind themselves to a network port on the system - an addressable location in the OS to allow for segregation of network traffic.
- Example - TCP port 22 is only used for SSH processes
- To understand if a port is in used and listening for a connection request:
natstat -an | grep -w LISTEN- To understand what each service or port is being used for, can check in the services file under
/etc - Example:
cat /etc/services | grep -w 53 - This begs the question, what ports should be open for nodes on the Kubenetes cluster? Answer: Review the documentation!
- https://kubernetes/doc.setup/production-environment/tools/production-environment/tools/kubeadm/install-kubeadm/#check-required-ports
4.9 - Minimize IAM Roles
- As discussed in the section Limit Node Access, it's never a good idea to use the Root account to perform daily tasks, SSH hardening can prevent root access and force users to using their own user accounts.
- Root accounts are equivalent to Admin accounts in Windows and Root Accounts in public cloud platforms e.g. AWS
- Note: AWS used as an example for this section but topics apply
- 1st account (Root account) created - User can log into management credentials
- Any and all functions can be carried out by this account on the management account
- Root account, in line with the least privilege principle, should be used to create new users and assign them the appropriate permissions
- The credentials for the root account should be saved and secured as appropriate
- When a new user is created, the least privilege is assigned depending on the associated IAM (Identity Access Management) policy.
- E.g. developers have ability to create EC2 instances, but can only view the S3 Buckets
- For further ease of assignment, users could be added to particular role groups or IAM groups - an IAM policy can then be attached to the group and assigned automatically.
- For resources and services, by default, no permissions are allowed. This cannot be achieved via IAM policies, roles must be developed.
- Allows secure access to an AWS Resource(s)
- Example - Allow EC2 Instance Access to an S3 Bucket.
- Note: Programmatic access can be configured, but this is typically less secure than via IAM methods.
4.10 - Minimize External Access to the Network
- To view the ports that are open and listening for requests on your system, utilize the netstat command: netstat -an | grep -w LISTEN
- By default, many of these ports can accept connections from any other device on the network - undesirable via the principle of least privilege
- In production environments, with multiple clients and servers involved, it's beyond important to implement network security to only allow or restrict access to various services
- Security can be provided via network-wide or external firewalls e.g.
- Cisco ASA
- Juniper NGFW
- Barracuda NGFW
- Fortinet
- Alternatively, firewalls can be applied per server.
4.11 - UFW Firewall Basics
- UFW = Uncomplicated Firewall
- Considering an application setup where one needs to restrict access to an Ubuntu Server - call it app01
- The server should only accept SSH connections on Port 22 from a particular IP address
- Additionally, the server runs a web server on http port 80
- All other users in a particular IP range should be allowed
- Any other unused ports should be closed
- To help with this, can use the netfilter CLI tool and IPTables
- IPTables - Most common for Linux, but requires a steep learning curve
- UFW = Alternative that provides a frontend for IPTables
- On the machine:
netstat -an | grep -w LISTEN - The UFW tool can be installed via the following:
apt-get updateapt-get install ufwsystemctl enable ufwsystemctl start ufw- UFW Rules:
- Check the UFW Status: ufw status
- In example, want to allow 80 and 22 from particular sources, but no outgoing
ports need closing:
- Allow outgoing by default:
ufw allow outgoing- Deny ingress by default (before making exceptions)
ufw default deny incoming- Allow from particular IP address on particular port e.g. SSH 22
ufw allow from 172.16.238.5 to any port 22 proto tcp- Allows inbound connections from the IP address defined to port 22 on any reachable IP address on app01
ufw allow from 172.16.238.5 to any port 80 proto tcp- Allows connections on port 80 from IP address
ufw allow from 172.16.100.0/28 to any port 80 proto tcp- Allows access on port 80 from IPs in any range
ufw deny 8080- Denies all access on port 8080 (not needed if denying access by default)
- To enable:
ufw enable ufw statusto check implementation
- To delete rule:
ufw delete <rule> or <rule number>
4.12 - Linux Syscalls
- To understand how Syscalls are made, need to understand how a process runs:
- Kernel - Major OS component that interfaces between hardware and processes
- Kernel can be split into Kernel and User Spaces
- Kernel Space - OS-related applications and software e.g. drivers
- User Space - Where applications are ran
- When a program runs in the user space, suppose one that wants to write data to a file:
- Applications make system calls to the Kernel Space for tasks e.g.:
- Open a file
- Write to a file
- Define a variable
- open()
- close()
- Tracing Syscalls:
which strace:- Installed by default
- Used to inspect / provide output of the syscalls made when running a command
- Output presented in form of:
syscall(<path to executable file>, [arg 1, arg 2, ...], ...)
- To trace the syscalls of a running process:
- Get process ID (PID) -
pid <process> - Get Syscalls:
strace -p PID
- Get process ID (PID) -
- Note: the
-cflag can be used for more detailed outputs.
4.13 - AquaSec Tracee
- Open-source tool used for tracing container syscalls
- Makes use of EBPF to trace the system at runtime without interfering with the Kernel:
- extended Berkeley Packet filter
- Tracee can be easily ran as a container:
- Prerequisites:
- As ran as a container, it runs the EBFP program and stores it at /tmp/tracee by default
-
To ensure built once and usable for successive runs, a set number of bind mounts are required:
Mount Purpose /tmp/traceeDefault Workspace /lib/modulesKernel Header Access /usr/srcKernel Header Access -
Addtionally, due to tracing syscalls, Tracee requires privileged capabilities:
-
Using Tracee:
-
To observe syscalls generated by a single command:
shell docker run --name tracee --rm --privileged --pid=host \ -v /lib/modules/:/lib/modules/:ro -v /usr/src:/usr/src:ro \ -v /tmp/tracee:/tmp/tracee aqasec/tracee:0.4.0 --trace comm=ls -
Returns syscalls made during the run of the ls command
-
To observe syscalls for all new processes on the host:
shell docker run --name tracee --rm --privileged --pid=host \ -v /lib/modules/:/lib/modules/:ro -v /usr/src:/usr/src:ro \ -v /tmp/tracee:/tmp/tracee aqasec/tracee:0.4.0 --trace pid=new -
For new containers:
shell
docker run --name tracee --rm --privileged --pid=host \
-v /lib/modules/:/lib/modules/:ro -v /usr/src:/usr/src:ro \
-v /tmp/tracee:/tmp/tracee aqasec/tracee:0.4.0 --trace container=new
4.14 - Restricting Syscalls Using Seccomp
- Previously seen how to view syscalls in an os.
- In practice, ~435 syscalls are available in Linux, all can be used by applications in the user space.
- In reality, applications wouldn't need to use anywhere near as many syscalls - application should only be able to use the required syscalls for their application
- By default, the Linux Kernel allows any syscall to be invoked by programs in the user space - increasing attack surface
- To resolve, can utilise seccomp
- Secure Computing - A linux kernel-native feature designed to constrain applications to only make the required syscalls
- To check if host supports it, look in the boot config file:
grep -i seccomp /boot/config-$(uname -r) - If
CONFIG_SECCOMP = y-> seccomp is supported - To demonstrate how applications can be finetuned, consider running a container e.g. docker/whalesay:
docker run docker/whalesay cowsay hello!- Knowing the app works - can run the container and exec into it:
docker run -it --rm docker/whalesay /bin/sh- If users wanted to change the time for example, it would not be allowed
- Process running is
shell/bin/sh - Inspecting the process id -> PID = 1
- Inspecting the PID can check via seccomp:
- Grep seccomp
/prc/1/status - If value = 2 -> seccomp enabled:
- Modes:
- 0 = Disabled
- 1 = Strict -> Blocks all syscalls except read, write, exit, rt_sigreturn
- 2 => Selectively filters syscalls
- How was the seccomp filter applied? What restrictions has it got applied?
- Docker has seccomp enabled by default and restricts ~60 of the 435 syscalls
- Defined by json file(s)
- Defines architectures for files
- Syscall arrays -> names and actions (allow or deny)
- Default action -> what to do with syscalls not defined in the syscall array
- Json files can act as whitelists or blacklists
- Whitelists can be very restrictive as any which you do want to run have to be added
- Blacklists -> allows all by default bar any in the array;
more open than whitelists but more susceptible to
attacks
- Default docker seccomp profiles block calls such as reboot, mount and unmount, clock time managements
- Default seccomp profiles are good but custom files are better for particular scenarios
- To utilise a custom seccomp profile, can add associated flag to the
docker runcommand i.e.:
docker run -it --rm --security-opt seccomp=/path/to/file.json docker/whalesay /bin/sh - Seccomp can be disabled for containers completely by setting the flag to
--security-opt seccomp=unconfined- SHOULD NEVER BE USED
4.15 - Implementing Seccomp in Kubernetes
- By default, Docker supplies its own default seccomp profile in containers in mode 2
- When running in kubernetes, the number of blocked syscalls and seccomp enablement may be different -> seccomp may not be enabled by default in Kubernetes (as of v1.20)
- To implement seccomp - use a pod definition file, to apply, need to add an appropriate field in the securityContext area:
yaml
  securityContext:
    seccompProfile:
      type: RuntimeDefault
-
Note: When adding the profile in this manner, it is advised to add to the container's securityContext field a disabling of privilege escalation i.e.:
yaml containers: - securityContext: allowPrivilegeEscalation: false -
This helps the application run ONLY with the Syscalls it requires for the process
- Note: Type can be set to Unconfined, but this is not recommended and is the default profile
- For custom profiles in the pod security context:
yaml
  securityContext:
    seccompprofile:
      type: Localhost
      localhostProfile: <path to file>
- Note: The profile path must be relative to the default seccomp file in
/var/lib/kubelet/seccomp - Example:
- Creating an audit seccomp profile with
defaultAction SCMP_ACT_LOG - Syscalls from the container will be stored in
/var/log/syscall- Logs user id, process ID, etc about the processes used
- To help map the syscall numbers to syscalls is to check the following:
grep -w 35 /usr/include/asm/unistd_64.sh - Where 35 can be replaced with the PID
- Tracee can also be used for this as discussed previously
- Consider another seccomp profile that rejects by default (
defaultAction = SCMP_ACT_ERRNO) => any pod created with this cannot run as all Syscalls are blocked by default - Once the Syscalls are analysed and audited, users can identify the allowed syscalls and add them to a custom seccomp profile => recommended to block all by default and allow only ones needed.
- Note: A custom seccomp profile won't be required to be created from scratch, but a template one may need to be attached to a pod/deployment etc.
4.16 - AppArmor
- Although Seccomp works well to restrict the syscalls a container makes (or pods/objects in Kubernetes), it cannot be used to restrict a programs access to objects like files and directories.
- Apparmor = Linux Security module, used to confine a program to a limited set of resources
- Installed by default for most distributions
- Use systemctl status apparmor to check status
- To use, the associated Kernel module must first be loaded on all nodes
where containers can run
- Check enabled file under:
/sys/module/apparmor/parameters/enabled
Shows Y or N depending on enablement
- Check enabled file under:
- Similar to Seccomp, apparmor is applied via profiles, which must be loaded into the Kernel; checkable via
/sys/kernel/security/apparmor/profiles -
Profiles are simple text files that determines what capabilities are allowed or restricted
-
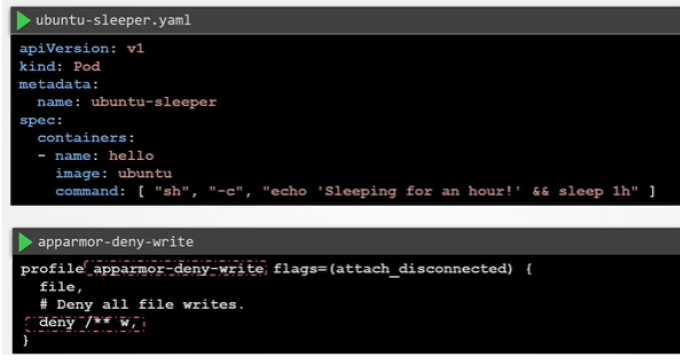
Example:
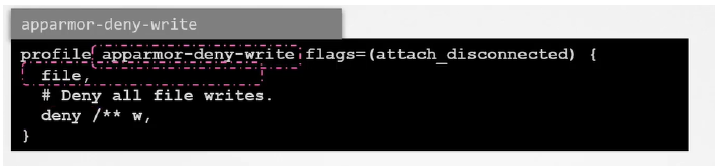
- Above contains two rules:
- File -> allow file system -> allows complete access to filesystem
-
Deny rule -> denies write access to all files under root system including subdirectories
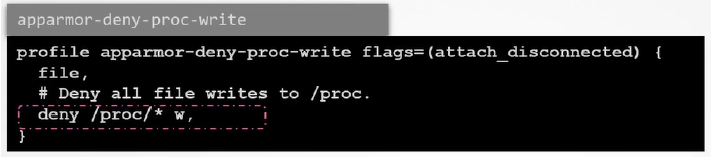
-
Example 2: Deny Write Access to Only Files Under a Particular Subdirectory
- Apparmor profiles can be created via various tools
- The status of the profiles loaded can be checked using aa-status
- Profiles can be loaded in 3 modes:
- Enforce - Apparmor will enforce the rules on any application that fits the profile
- Complain - Apparmor will allow the actions without restrictions but the actions are logged as events
- Unconfined - Any tasks are allowed and no logging occurs
4.17 - Creating AppArmor Profiles
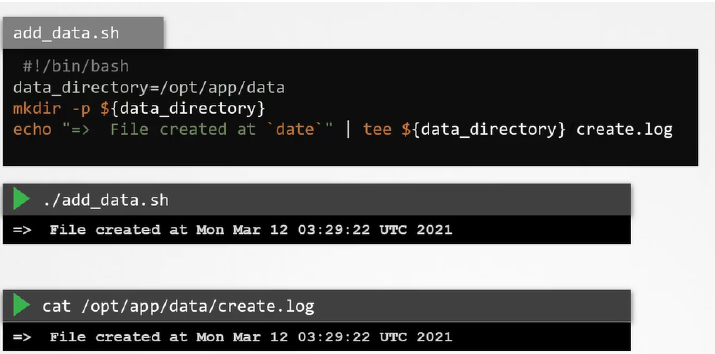
- Example Script used in lecture - creates a directory and writes a file to said directory, the event of creation is logged in "create.log"
- Tools provided by apparmor can be used to facilitate the creation of apparmor profiles
- To install the utilities for apparmor:
apt-get install -y apparmor-utils - Once done, can generate a profile via:
aa-genprof /path/to/script.sh - This prepares apparmor to develop an accurate profile by scanning the system during the application's runnin
- Once the application has run in a separate window, in the original window, enter "S" to scan the system for AppArmor events
- This will generate a series of questions that the user must answer to help develop the profile
- E.g. for the example above, need to think about allowing the script access to the mkdir command or the tee command
- Each event is reviewed on severity level of 1-10 (10 = most severe)
- Resultant actions can be allowed/denied/inherited etc as required
- The new profile can be viewed and validated by
aa-status - The profiles are stored under
/etc/apparmor.d/ - It's often advised to rerun the application with slightly different parameters to check the enforcement of the apparmor profile.
- To load a profile:
apparmor_parser path/to/profile- No output = success
- Disable profile:
apparmor_parser -R path/to/profile- No output = success
- Need to create a symlink to the profile and the apparmor disable directory:
ln -s /path/to/profile /etc/apparmor.d/disable/
4.18 - AppArmor in Kubernetes
- AppArmor can also be used to restrict the functions of containers orchestrated by Kubernetes
- At the time of writing / when the recording was done, Kubernetes support for it was in beta
- Prerquisites:
- The AppArmor Kernel module must be enabled on all nodes in the K8s cluster where pods are expected to run
- AppArmor profiles must be loaded in the Kernel
- The container runtime should support AppArmor - Generally expected, Docker know to support.
- Example:
- Ensure that the profile is loaded on all the nodes with aa-status if the profile is listed in the required director
- As the support is only in beta, need to link it by annotations:
yaml
  ...
  metadata:
    annotations: container.apparmor.security.beta.kubernetes.io/<container_name>:localhost/<profile name>
  ...
- When the pod is created, you can inspect and test the pods capabilities to test the profile enforcement.
4.19 - Linux Capabilities
- Previously seen that even when running a container with an unconfined seccomp profile, it couldn't be manipulated
- The same is applicable to Kubernetes even though it doesn't use seccomp by default
- To understand this, need to review how processes run in Linux:
- Processes are separated into privileged and unprivileged (for kernel versions less than 2.2)
- For 2.2 onwards, processes are split into capabilities:
- Privileged processes possess a number of capabilities e.g.:
CAP_CHOWNCAP_NETMODECAP_SYS_BOOT- Allows reboots
- To check the required capabilities for a command:
- getcap /usr/bin/ping for example
- For a process:
- Get the PID:
ps -ef | grep /usr/sbin/sshd | grep -v grep getpcaps <PID>
- Get the PID:
- Pivoting back to the pod in the example, the reason the certain commands like the change time couldn't work, the operation wasn't permitted
- Even if ran as a root user, the container is only started with limited capabilities (14 if Docker = runtime)
- Capabilities for a container can be managed at the container's security context:
apiVersion: v1
kind: Pod
metadata:
  name: ubuntu-sleeper
spec:
  containers:
  - name: ubuntu-sleeper
    image: ubuntu
    command: ["sleep", "1000"]
    securityContext:
      capabilities:
        add: ["SYS_TIME"]
- To drop a capability, add drop:
["Capability 1", "Capability 2", ...]